Getting Started with Model Context Protocol (MCP)—A Beginner's Guide
In this quick guide, you’ll learn what MCP is, how to use it, and even build your own server. Let’s get started.

We've all been there—your favorite AI model is either hallucinating or giving answers irrelevant to your particular problem due to a lack of context and/or tools. Talk about frustrating.
That's precisely the problem the Anthropic team set out to solve with their Model Context Protocol (MCP) standard.
In this short guide, you'll learn all about MCPs, how to start using them, and even build one of your own.
Let's get into it!
What is MCP?
MCP is an open standard that connects AI models to external tools and data sources. Instead of AI assistants being limited to their training data, MCP lets them interact with databases, file systems, APIs, and custom applications in real time.
Think of it as USB-C for AI applications—a standardized way to plug AI models into different data sources, tools, and services.
Benefits of Using MCPs
Connect to Real Tools and Data: MCP breaks down the walls between AI models and your actual work environment. Your AI assistant can read files, query databases, call APIs, and execute scripts—all with your permission.
Build Once, Use Everywhere: The key power of MCP is interoperability. Build an MCP server once, and it works with any MCP-compatible AI client. Whether you're using Claude Desktop, Cursor, VS Code, or dozens of other applications, they can all leverage the same MCP servers.
Enable Multi-System Communication: MCP servers can act as bridges between different systems and AI models. You can create workflows where AI agents communicate with each other through shared MCP servers, enabling complex multi-step automation.
Extend Without Rebuilding: Instead of every AI application building its own integrations, MCP provides a standard interface. Developers can extend AI capabilities without rebuilding the same connections over and over.
Maintain Control and Security: You control what data and tools your AI can access. MCP servers run with the permissions you grant them, and many clients ask for approval before executing potentially sensitive operations.
Access Real-Time Information: Unlike static training data, MCP enables AI models to fetch current information from live systems—current weather, recent emails, latest database records, or real-time system status.
What You'll Learn
This guide takes you from zero MCP knowledge to building your own functional MCP server. You'll start by using pre-built servers with Claude Desktop to understand the basics. Then we'll switch to Cursor for development work and build a weather server that fetches real-time forecasts and alerts.
By the end, you'll understand the core MCP concepts, know how to debug common issues, and have the foundation to build servers for your specific needs.
MCP Basics: Using Pre-Built Servers with Claude Desktop
Let's start with the easiest possible introduction to MCP. We'll use Claude Desktop because it has excellent MCP support and requires zero coding to get started.
Setting Up Claude Desktop with MCP
First, download Claude Desktop if you haven't already. Choose either macOS or Windows (Linux isn't supported yet). Make sure you're running the latest version by clicking the Claude menu and selecting "Check for Updates..."
Now we'll add a filesystem MCP server that lets Claude read and write files on your computer. Don't worry - it will ask for permission before doing anything.
Configuring the MCP Server
Open the Claude menu on your computer and select "Settings..." (not the Claude Account Settings in the app window).
Click on "Developer" in the left sidebar, then click "Edit Config". This will create and open the configuration file:
- macOS:
~/Library/Application Support/Claude/claude_desktop_config.json - Windows:
%APPDATA%\Claude\claude_desktop_config.json
Option 1: Use the default text editor
# On Mac
open ~/Library/Application\ Support/Claude/claude_desktop_config.json

# On Windows
notepad %APPDATA%\Claude\claude_desktop_config.json
Option 2: Navigate with Finder/File Explorer
- Mac: Press Cmd+Shift+G in Finder, type
~/Library/Application Support/Claude/ - Windows: Press Win+R, type
%APPDATA%\Claude\, press Enter
Replace the file contents with this JSON configuration:
On Mac/Linux:
{
  "mcpServers": {
    "filesystem": {
      "command": "npx",
      "args": [
        "-y",
        "@modelcontextprotocol/server-filesystem",
        "/Users/yourusername/Desktop",
        "/Users/yourusername/Downloads"
      ]
    }
  }
}
On Windows:
{
  "mcpServers": {
    "filesystem": {
      "command": "npx",
      "args": [
        "-y",
        "@modelcontextprotocol/server-filesystem",
        "C:\\Users\\yourusername\\Desktop",
        "C:\\Users\\yourusername\\Downloads"
      ]
    }
  }
}
Replace yourusername with your actual username (run whoami in a CLI if you're not sure). The paths should point to directories you want Claude to access and modify.
Install Node.js (Required)
This MCP server uses Node.js. Verify you have it installed by opening Terminal (Mac) or Command Prompt (Windows) and running:
node --version
If you get "command not found" or "node is not recognized", download Node.js from nodejs.org.
Save the configuration file and restart Claude Desktop completely.
Testing Your First MCP Connection
After restarting, you should see a slider icon in the bottom left corner of the input box. Click it to see your available tools.
Image Source: MCP website
<details> <summary style="font-weight: bold;"> Debugging errors: </summary> </br>If you get an error such as "Could not attach MCP server Filesystem," or "MCP Filesystem: Server disconnected," follow these steps to debug:
</br>- Run this command to view Claude desktop logs:
tail -n 20 -F ~/Library/Logs/Claude/mcp*.log
<i>Tip: Paste your logs into an LLM to get debugging help</i>
</details> </br>Now try these commands with Claude:
- "Can you write a short poem and save it to my desktop?"
- "What files are in my Downloads folder?"
- "Can you create a new folder called 'MCP-Test' on my desktop?"
When Claude suggests using tools, you'll see a permission prompt. Click "Allow" to let it proceed. It should now be able to access your files.
Congratulations! You just experienced MCP in action. Claude can now interact with your filesystem because you connected it to an MCP server that provides file operations.
What Just Happened?
Here's the simple breakdown:
- MCP Server: The filesystem server you installed provides tools for file operations
- MCP Client: Claude Desktop connects to your server and gets a list of available tools
- AI Integration: When you ask Claude to work with files, it automatically uses the appropriate tools
- User Control: You approve each action before it happens
This client-server setup means you can connect Claude to databases, APIs, other applications, or custom tools you build yourself.
The diagram below gives a visual representation of what's happening.
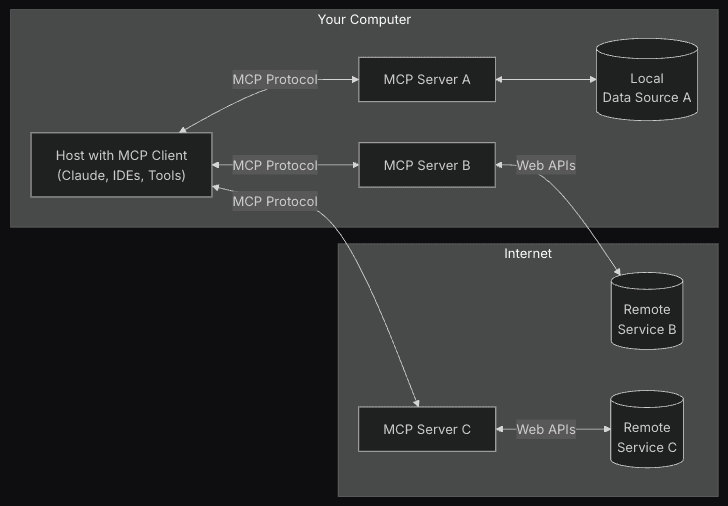
Image Source: MCP website
How to Use MCPs with Cursor for AI-powered Development
Claude Desktop is great for general use, but to better leverage MCPs in your coding workflows, you want to use them with a client like Cursor (everyone's favorite AI-powered Code Editor).
You can use VSCode too if you're a boomer.
Setting Up MCP in Cursor
Cursor has built-in MCP support. To enable it:
- Download and install Cursor
- Open Cursor's settings
- Click on "Tools & Integrations"
- Click the "Add New MCP" button, an
mcp.jsonfile should open - Paste the JSON configuration snippet from earlier (for the filesystem server) into the
mcp.jsonfile
This allows you to connect to the same filesystem server you used with Claude Desktop, but this time it's integrated into your coding environment.
The power here is that Cursor's AI can now:
- Read your project files to understand context
- Create new files and folders
- Edit existing code
- Run scripts and commands
- All while maintaining full awareness of your project structure
Try opening a project in Cursor and asking it to reference a file outside somewhere on your computer for context. You'll see how MCP transforms the AI from a general assistant into a project-aware coding partner.
Time to Build: Building Your Own MCP Server with Cursor
Now for the fun part—building your own MCP server. We'll create a weather server that can fetch forecasts and alerts. This example works well because it's practical, simple to understand, and shows all the core MCP concepts.
Setting Up the Project
Open Cursor and create a new folder for your project:
mkdir weather-mcp-server
cd weather-mcp-server
We'll use Python for this example. Create a new file called weather.py and paste in this code:
from typing import Any
import httpx
from mcp.server.fastmcp import FastMCP

# Initialize FastMCP server
mcp = FastMCP("weather")

# Constants for the National Weather Service API
NWS_API_BASE = "https://api.weather.gov"
USER_AGENT = "weather-mcp-server/1.0"
Here's what each import does:
typing.Any: Helps with type hints (makes code clearer)httpx: Modern HTTP client library for making web requests (likerequestsbut async-friendly)mcp.server.fastmcp: The MCP framework that handles all the protocol details for us
The FastMCP class automatically converts your Python functions into MCP tools using function signatures and docstrings.
We're using the NWS (National Weather Service) API (https://api.weather.gov) and the USER_AGENT identifies our server to the API (good API citizenship).
Next, install the required dependencies:
pip install mcp httpx
Adding Helper Functions
Add these helper functions to handle API requests—these do the heavy lifting of talking to the weather API:
async def make_nws_request(url: str) -> dict[str, Any] | None:
    """Make a request to the NWS API with proper error handling."""
    headers = {
        "User-Agent": USER_AGENT,
        "Accept": "application/geo+json"
    }
    async with httpx.AsyncClient() as client:
        try:
            response = await client.get(url, headers=headers, timeout=30.0)
            response.raise_for_status()
            return response.json()
        except Exception:
            return None

def format_alert(feature: dict) -> str:
    """Format an alert feature into a readable string."""
    props = feature["properties"]
    return f"""
Event: {props.get('event', 'Unknown')}
Area: {props.get('areaDesc', 'Unknown')}
Severity: {props.get('severity', 'Unknown')}
Description: {props.get('description', 'No description available')}
Instructions: {props.get('instruction', 'No specific instructions provided')}
"""
The make_nws_request function is our generic API caller that:
- Sets proper headers (User-Agent identifies us, Accept tells the API we want GeoJSON format)
- Uses
async withto properly manage the HTTP connection - Includes error handling - if anything goes wrong, it returns
Noneinstead of crashing - Has a 30-second timeout to prevent hanging requests
The format_alert function takes the raw API response and makes it human-readable. The NWS API returns complex JSON objects, but we only need the key information formatted nicely.
Creating Your First Tool
Now let's add a tool that fetches weather alerts for a given state:
@mcp.tool()
async def get_alerts(state: str) -> str:
    """Get weather alerts for a US state.

    Args:
        state: Two-letter US state code (e.g. CA, NY)
    """
    url = f"{NWS_API_BASE}/alerts/active/area/{state}"
    data = await make_nws_request(url)

    if not data or "features" not in data:
        return "Unable to fetch alerts or no alerts found."

    if not data["features"]:
        return "No active alerts for this state."

    alerts = [format_alert(feature) for feature in data["features"]]
    return "\n---\n".join(alerts)
This is our first MCP tool! Here's how it works:
The @mcp.tool() decorator tells FastMCP "this function should be available as a tool to AI clients." The framework automatically:
- Reads the function signature to understand what parameters it needs
- Uses the docstring as the tool description
- Converts the type hints into a proper schema for AI models
The function itself builds a URL for the NWS alerts endpoint, makes the request, and processes the response. Notice how we handle different scenarios:
- API failure → return an error message
- No alerts found → return a friendly "no alerts" message
- Alerts found → format each one and join them with separators
Why this works well: AI models get a clear description ("Get weather alerts for a US state") and know exactly what parameter to provide (a two-letter state code). The return value is always a human-readable string.
Adding a Second Tool
Let's add another tool for weather forecasts. This one is slightly more complex because it requires two API calls:
@mcp.tool()
async def get_forecast(latitude: float, longitude: float) -> str:
    """Get weather forecast for a location.

    Args:
        latitude: Latitude of the location
        longitude: Longitude of the location
    """
    # First get the forecast grid endpoint
    points_url = f"{NWS_API_BASE}/points/{latitude},{longitude}"
    points_data = await make_nws_request(points_url)

    if not points_data:
        return "Unable to fetch forecast data for this location."

    # Get the forecast URL from the points response
    forecast_url = points_data["properties"]["forecast"]
    forecast_data = await make_nws_request(forecast_url)

    if not forecast_data:
        return "Unable to fetch detailed forecast."

    # Format the periods into a readable forecast
    periods = forecast_data["properties"]["periods"]
    forecasts = []
    for period in periods[:5]:  # Only show next 5 periods
        forecast = f"""
{period['name']}:
Temperature: {period['temperature']}°{period['temperatureUnit']}
Wind: {period['windSpeed']} {period['windDirection']}
Forecast: {period['detailedForecast']}
"""
        forecasts.append(forecast)

    return "\n---\n".join(forecasts)
Here's how this tool works:
Step 1: Get the Grid Point - The NWS API doesn't take coordinates directly for forecasts. You first need to convert lat/lng coordinates to their internal grid system by calling the /points/ endpoint.
Step 2: Get the Actual Forecast - The first API call returns a URL for the forecast endpoint specific to that location. We then call that URL to get the actual forecast data.
Data Processing - The forecast comes back as an array of "periods" (tonight, tomorrow, tomorrow night, etc.). We:
- Take only the first 5 periods (to avoid overwhelming output)
- Extract the key information from each period
- Format it in a readable way
Running the Server
Add this at the end of your file:
if __name__ == "__main__":
    mcp.run(transport='stdio')
Now you can test your server directly in Cursor's terminal:
python weather.py
If you get no errors, your MCP server is live!
<details> <summary> Complete code: </summary>from typing import Any
import httpx
from mcp.server.fastmcp import FastMCP
# Initialize FastMCP server
mcp = FastMCP("weather")
# Constants for the National Weather Service API
NWS_API_BASE = "https://api.weather.gov"
USER_AGENT = "weather-mcp-server/1.0"
async def make_nws_request(url: str) -> dict[str, Any] | None:
"""Make a request to the NWS API with proper error handling."""
headers = {
"User-Agent": USER_AGENT,
"Accept": "application/geo+json"
}
async with httpx.AsyncClient() as client:
try:
response = await client.get(url, headers=headers, timeout=30.0)
response.raise_for_status()
return response.json()
except Exception:
return None
def format_alert(feature: dict) -> str:
"""Format an alert feature into a readable string."""
props = feature["properties"]
return f"""
Event: {props.get('event', 'Unknown')}
Area: {props.get('areaDesc', 'Unknown')}
Severity: {props.get('severity', 'Unknown')}
Description: {props.get('description', 'No description available')}
Instructions: {props.get('instruction', 'No specific instructions provided')}
"""
@mcp.tool()
async def get_alerts(state: str) -> str:
"""Get weather alerts for a US state.
Args:
state: Two-letter US state code (e.g. CA, NY)
"""
url = f"{NWS_API_BASE}/alerts/active/area/{state}"
data = await make_nws_request(url)
if not data or "features" not in data:
return "Unable to fetch alerts or no alerts found."
if not data["features"]:
return "No active alerts for this state."
alerts = [format_alert(feature) for feature in data["features"]]
return "\n---\n".join(alerts)
@mcp.tool()
async def get_forecast(latitude: float, longitude: float) -> str:
"""Get weather forecast for a location.
Args:
latitude: Latitude of the location
longitude: Longitude of the location
"""
# First get the forecast grid endpoint
points_url = f"{NWS_API_BASE}/points/{latitude},{longitude}"
points_data = await make_nws_request(points_url)
if not points_data:
return "Unable to fetch forecast data for this location."
# Get the forecast URL from the points response
forecast_url = points_data["properties"]["forecast"]
forecast_data = await make_nws_request(forecast_url)
if not forecast_data:
return "Unable to fetch detailed forecast."
# Format the periods into a readable forecast
periods = forecast_data["properties"]["periods"]
forecasts = []
for period in periods[:5]: # Only show next 5 periods
forecast = f"""
{period['name']}:
Temperature: {period['temperature']}°{period['temperatureUnit']}
Wind: {period['windSpeed']} {period['windDirection']}
Forecast: {period['detailedForecast']}
"""
forecasts.append(forecast)
return "\n---\n".join(forecasts)
if __name__ == "__main__":
mcp.run(transport='stdio')
Connecting to Cursor
To use your weather server with Cursor's AI, you need to configure Cursor to connect to it. Add this to the mcp.json file from earlier in your Cursor settings (new entry under mcpServers):
{
  "weather": {
    "command": "python",
    "args": ["/absolute/path/to/your/weather.py"]
  }
}
Now when you chat with Cursor's AI, you can ask questions like:
- "What are the current weather alerts in California?"
- "Get me the forecast for San Francisco (latitude 37.7749, longitude -122.4194)"
Common Gotchas and Fixes
Path Issues: Always use absolute paths in your configuration. Relative paths often break because the working directory might not be what you expect.
API Errors: The National Weather Service API only works for US locations. If you're testing with international coordinates, you'll get errors.
Permission Problems: Make sure your Python script is executable and all dependencies are installed.
Tool Not Showing: If Cursor doesn't see your tools, restart Cursor after updating the configuration.
Understanding the Core Concepts
Now that you've built a working MCP server, let's understand the three main primitives MCP provides:
Tools: Let AI Models Take Actions
Tools are functions that AI models can call to perform actions. In our weather server, get_alerts and get_forecast are tools. Tools are model-controlled - the AI decides when to use them based on user requests.
Use tools when you want the AI to:
- Fetch data from APIs
- Execute commands
- Perform calculations
- Interact with external services
Resources: Give AI Models Access to Data
Resources are files or data that AI models can read for context. Unlike tools, resources are application-controlled - the user explicitly selects which resources to include.
Use resources when you want to provide:
- File contents
- Database records
- API responses
- Documentation
Prompts: Reusable Templates for Common Tasks
Prompts are predefined templates that help users accomplish specific tasks. They're user-controlled and appear as quick actions or slash commands in client applications.
Use prompts for:
- Common workflows
- Standardized formats
- Multi-step processes
- Team templates
Our MCP used all three of these.
Debugging and Troubleshooting
Things will go wrong when you're building MCP servers. Here's how to debug them effectively in Cursor.
Common errors:
- Your server doesn't appear in Cursor's MCP list
- Tools don't execute when the AI tries to use them
- Error messages in the terminal when running your server
- Cursor can't connect to your server
Essential Debugging Tools
MCP Inspector is your best friend for debugging. Install it globally:
npx @modelcontextprotocol/inspector path/to/your/weather.py
The Inspector lets you:
- Test your server without an AI client
- See exactly what tools and resources your server provides
- Execute tools manually with custom inputs
- View detailed error messages
Quick Fixes That Usually Work
- Restart Cursor after changing MCP configuration
- Use absolute paths everywhere in your config
- Check the terminal for error messages when your server starts
- Test with Inspector before connecting to Cursor
- Verify your Python environment has all required packages
Read more on debugging MCPs.
What's Next?
You've now experienced MCP as a user and built your own server. Here's how to keep growing your MCP skills.
Browse Existing MCP Servers for Inspiration
- Check out the official MCP servers repository to see what others have built:
-
Database connectors (PostgreSQL, SQLite)
-
API integrations (GitHub, Slack, Google Drive)
-
Development tools (Git operations, code analysis)
-
Productivity tools (calendar, email, file management)
</br>Each server shows different patterns and approaches you can learn from and draw inspiration for your own MCPs!
- Learn how to use LLMs to build MCPs
Congrats! You've gone from knowing nothing about MCP to building a working server that can work with various clients to make AI more useful.
This guide has provided you with the foundational knowledge to start building servers for your specific needs. The AI tools you use every day are about to become much more powerful!
In the next article, we'll explore how to leverage MCP in Cursor to 10x your productivity as a developer!